Thanks to the innovative new Mini-Color photobook you will be able to conjure an attractive album in the twinkling of an eye.
From vacation sunshine to a dark picture box? Packed into a bag after a swinging fete?In a slip cover plastic album and never seen again?Theres an end to all of this! The solution? Mini-Color.Thanks to the innovative new Mini-Color photobook you will be able to conjure an attractive album in the twinkling of an eye. Fix finished! Whenever you want to make a change, another little click will do to replace an old picture with a new one. Your pictures will shine brilliantly as when taken, without disturbing plastic covers. You will be able to relive your vacation!Album 4:6 M FrostedElegant and airy.The frosted look album 4:6 presents your shots with an elegant and airy aspect. Behind the partly transparent cover your pictures shine in the typical Mini-Color brilliance. A newly developed spine folding mechanism arranges the pages equally to the left and right sides when being flipped open and makes for an authentic book character.Album 4:6 M AntraciteCarbon-style coverStriking and trendythats the carbon-styled anthracite album. This album, produced of high quality, 1000 μ thick black PP is truly cool! The frontal window of the sturdy cover invites the eye to enter and view the presentation within.
Album 4:6 XL Deluxe
Leather meets velvety.
Pure leather deluxe.Smooth on the outside,velvety inside.And the whole album designed in a luscious blank.In this exquisite album of real leather* your pictures are presented as genuine works of art. The twinkling binding rings of polished chrome finish match this deluxe outfit perfectly. Also a fine and extraordinary gift! *thermo reactivated leather
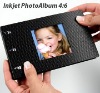
Print your own PhotoBook fast & easy on your home inkjet printer.
You can print on the special photo paper sheets with any standard photo inkjet printer. You are ready in no time at all. It's so easy.
1.Album preview
Select an image and drag & drop it in to your photo album page. Gives an overview on pages designed.
2.Print pictures
Print your designed pictures in turn.
3.Add picture
Before you insert additional pages, turn previous ones towards left side. This way you have enough space for inserting new pages.
4.Fix photos
Press t-shaped cut-outs in photo-pages gently from top into binding rings.