


Ads by Google


Products Item: | A-019-1 | Eco-friendly: | YES | OEM: | Welcome |
Size: | 64*63*32CM | Gross Weight: | 27KG | Net Weight: | 25KG |
Sample Time: | 5 DAYS | Produce Time: | 10 DAYS | MOQ: | 10 PCS |
Material: | SAFE | Composition: | Packing: | 10PCS/CARTON |
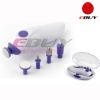
NAIL DRILL MANICURE MACHINE SET :
Elegant appearance Style, simple elegant modeling. Stable performance, high quality, use well in environment. Input voltage rage: 100-120V, 220-240V 60/50Hz for world wide. Output voltage scope: DC 1.25-17V. Continuously adjustable. The handset adopts the card buckles tight structure, safety, conveniently disassembles. Transmission system adopts the structure of dual absorption of shock, Extremely quiet and smooth - No Vibration. Max rotaion speed: 35,000 r.p.m Forward and reverse Operation switch. Over voltage and over current protection intruction in machine.Specification:
Main (power supply & Control) part
Rated voltage range:110-120V 50/60Hz Output rated voltage DC2-17V Rated power input:10W Output current:0.8AHand piece(motor)part
Working voltage:DC2-17V Rated current:0.56A No load speed:35000RPMPackage contains:
1. Twist-lock handpiece 1 pcs 2. Foot pedel control. 1 pcs 3. Power pack 1 pcs 4. Handpiece pedestal 1 pcs 5. Nail drill bits 6 pcs
HOW TO USE:
1Assemble your tools and supplies. You will need your nail drill and the appropriate nails. Also, be sure that your work area is level and clean.
2Read the manufacturer's directions that accompanied the nail drill. This will help you determine what type of nails that you need, and any additional safety equipment, you always should use safety goggles. It will also tell you exactly how to load the nails into the drill.
3Place marks on the piece of material you are about to nail. You can do this using the carpenter's pencil. These marks will indicate the desired spacing for the nails. Generally, you should place the nails at equal increments apart. For example, if you will be placing nails at 16 inches on center, then you place a nail in the center of the piece of material being nailed, and then 16 inches apart on either side until you reach the edge of the piece of material. To make these measurements ahead of time, mark them with the carpenter's pencil.
4Connect the nail drill to the air compressor with an air hose. The air compressor should be turned to the MAP (maximum allowable pressure) setting, usually 120 lbs. Find the MAP for your specific nail drill in the instruction manual.
5Place the nail drill over the mark you made on the wood. Wear your safety goggles and have a firm grip on the materials you are nailing. It may help to work with a partner.
6Release the safety mechanism. Do this carefully. You should again refer to the instructions to determine exactly how to do this on your particular model. Never release this mechanism until you are prepared to nail.
7Pull the trigger on the nail drill to release the nail. Continue to follow this step over every mark you made on the piece being joined.